Group graphic objects
Use the Group option on the Arrange menu to combine selected graphic objects into a group. This lets you treat the group as a single graphic object. For example, when you want several the objects to have the same colors, you can group them and change the colors of all of them at the same time.
A grouped object can be manipulated like a single object. For example, you can cut, copy, and paste groups, change their foreground or background color, or send the group to the front or back.
When you delete a group, all the individual objects in it are deleted.
In general, except for visibility, fill, and color, animation set up for a group of objects takes precedence over animation set up for individual objects within the group.
- For visibility animation, theInvisiblebehavior takes precedence.
- For fill animation, group animation is added to object animation.
- For color animation, applying color animations to an object group as well as to the individual objects in the group causes unexpected behaviors. To set up color animations for an object group, either apply the color animations to the group, or to the individual objects in the group.
As well, some positioning animation may be additive. Be sure to test group animation to ensure that it produces the effect you intend.
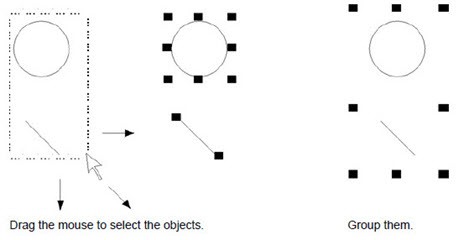
To group graphic objects:
- Select the objects to be grouped.
- ClickArrange>Group.TIP:You can double-click a group to edit it and select individual objects to edit within that group. You do not have to ungroup to edit the constituent objects in groups.The handles around each object are replaced by a single set of handles around the group. You can use these handles to resize the group, just as you would a single object.
Provide Feedback