Clustered Environment Configuration
- Open the Windows Service management console. Stop the following services:
- FTAnalyticsDataView
- FTAnalyticsDataImporter
- On second machine, create a folderC:\RockwellSoftware\FactoryTalkAnalyticsDataViewand copy thejdkandjrefolders from the DataView machine to the second machine.
- On second machine, create a folderC:\RockwellSoftware\FactoryTalkAnalyticsDataView\FTADataViewand copy theDataImporterfolder from DataView machine to the second machine.
- Open the dataimporterproperties.properties file and update the following properties:Database configuration:
- Configure the PostgreSQL database server:bds.cidb.url = jdbc:postgresql://<HostName>:5432/FTADataView (Format: jdbc:postgresql://<<Database Host Address>>: <<Database Port>>/<<Database name>>)(Server HostName where PostgreSQL is installed)
Elasticsearch node Configuration:- Configure Elasticsearch host:bds.cies.esNHosts=<Elasticserach server HostName>(Server HostName where Elasticsearch is installed)NOTE:Ensure that PostgreSQL and Elasticsearch are remotely accessible.
DataImporter Distributed Environment Configuration:- Change Distributed Environment setting to true:bds.cies.isDistributedEnvironment=true(for Multi node configure change it to True. By default, it is set to False for single node deployment)Servers

- Go to the<Installation_Directory>\dataimporter\configfolder and open thecluster.xmlfile in a text editor.
- Configure the following properties incluster.xmlfile for distributed environment:
- Configure cluster-name for Distributed Environment: <cluster-name>Hostname</cluster-name>
- Configure ports <ports>5711-5731</ports>
- Enable Multicast: multicast enabled=true
- Configure Member list for Distributed Environment:<member-list><member>Hostname1</member><member>Hostname2</member><member>Hostname3</member></member-list>
Configure cluster.xml File
- Open a Command Prompt window with administrator privileges and change the working directory to the<Installation_Directory>\dataimporterfolder.
- Run theinstallimporterservice.batfile to run DataImporter as a service.
- Go to system where DataView is installed and navigate to the<DataView_HOME>\FTADataView\dataview\configfolder.
- Open theapplication.propertiesfile in a text editor, in administrator mode.
- Change the following properties in theapplication.propertiesfile.DataSource:
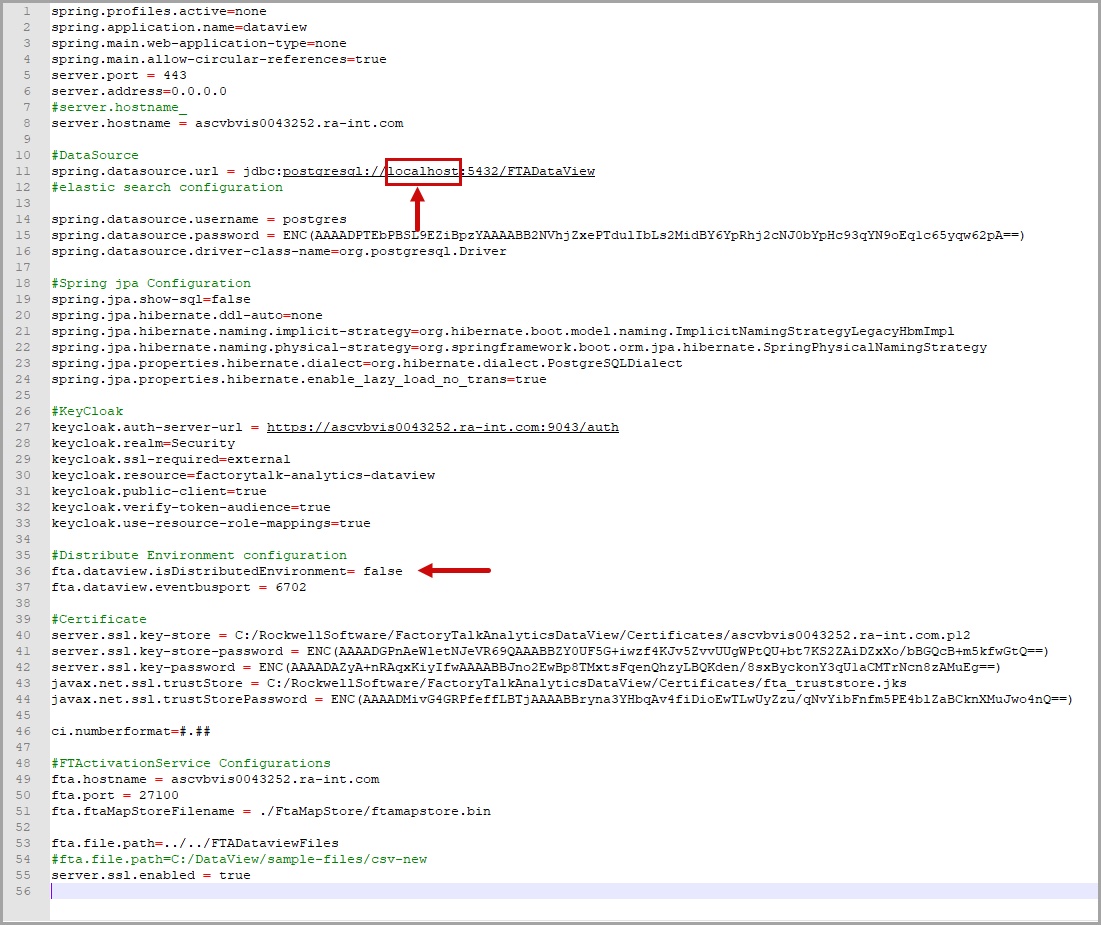
- Configure the PostgreSQL database server hostname:spring.datasource.ur1=jdbc:postgresql://<FQDN-hostname>:5432/FTA DataView(Server HostName where PostgreSQL is installed)
Distribute Environment configuration- Change Distributed Environment setting to true:fta.dataview.isDistributedEnvironment= true(for Multi node configure change it to True. By default, it is set to False for single node deployment)application.properties File
- Open thecluster.xmlfile in a text editor, in administrator mode.
- Configure the following properties incluster.xmlfile for distributed environment:
- Configure cluster-name for Distributed Environment:<cluster-name>Hostname</cluster-name>
- Configure ports <ports>5711-5731</ports>
- Enable Multicast: multicast enabled=true
- Configure Member list for Distributed Environment:<member-list> <member>Hostname1</member> <member>Hostname2</member> <member>Hostname3</member> </member-list>Configure cluster.xml File
 NOTE:Ensure that the cluster name is same in both the cluster.xml files of DataView and DataImporter.
- Open the Windows Service management console and start the following services:
- FactoryTalkAnalyticsDataView
- Open the log file and ensure that all the members are joined as shown:Log File

- If the members are joined successfully as shown in the log file, skip this step. If not, go to theC:\Windows\System32\drivers\etcand open thenetworksfile and add the respective system server name and corresponding IP address.Networks File

- Open the URL,https://<FQDN-hostname>/dataviewusing a web browser to open the DataView application.
- Login to the DataView application as Design User and create a connection to verify successful cluster configuration.Connection Success

Provide Feedback