Coils
Coils are graphic components of Ladder Diagram (LD) programs and
represent the assignment of Boolean outputs. In an LD program, a coil represents an action.
It must be connected on the left to a Boolean symbol, like a contact or the Boolean output
of a block.
Types of coils are available from the LD toolbox are:
- Direct Coil
- Reverse Coil
- Pulse Rising Edge Coil
- Pulse Falling Edge Coil
- Set Coil
- Reset Coil
Change the type of a coil at anytime after insertion.
When inserting coils in
POUs, assign variables using the Variable Selector. Names of assigned variables display
above the coil elements within POUs. Replace existing variables by double-clicking the coil
to access the
Variable Selector
or by single-clicking variable names to select from
drop-down combo-boxes containing the global and local variables. Also, single-click existing
variables, then type literal values in the text boxes provided. When inserting literal
values beginning with a letter or an underscore, enclose the variable name in single quotes
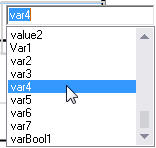
as follows: 'abc'.- Select a variable from the drop-down combo box:
- Type a literal value in the text box:
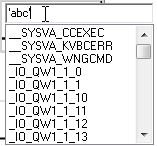
When selecting items like local variables, global variables, and defined words from
the drop-down combo-box, typing characters in the text box focuses on the possible
items.
While dragging coils from either the toolbox or within a diagram, the language
editor displays the possible drop points. Drop points display as plus signs in a black
circle. For elements, the possible drop points display on the rung. For instance, since a
rung can only have one coil on the right, the editor does not display possibilities when
dragging another coil onto the rung. However, if a parallel branch is placed around the
coil, the editor displays a possible location for another coil on the branch.
Drop
points on a run while dragging elements over the rung:

Task | Procedure |
|---|---|
Insert a coil |
|
Insert a parallel coil |
|
Drag a coil |
|
Change the type of a coil |
|
Align all coils in a diagram |
|
Provide Feedback