Alarm Manager contents for a large HMI device screen
The
Alarm Manager Large
alarm table appears on the predefined Alarm Manager
screen. This screen is in the Predefined Screens
folder in the Project Explorer
. The table exists for large, ten-inch or larger HMI device screens. Create an Alarm Manager Large
table with customized appearance and content instead of using the predefined Alarm Manager
screen.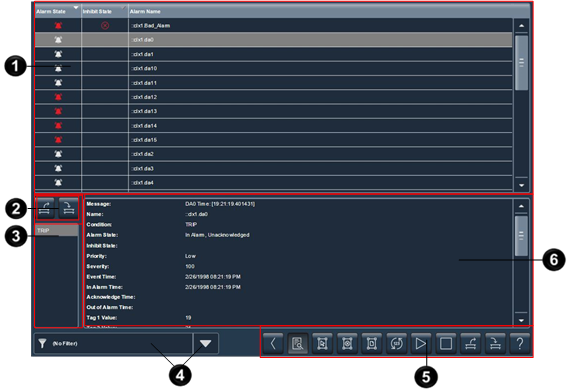
Item | Description | |
 | The list of alarms, in all states, for the controllers referenced in the View Designer project. The Alarm Manager displays tag-based alarms marked for use and evaluation. Each row contains an alarm and the conditions. Depending on configuration, the Alarm Name can appear as ::ControllerName.TagName or ::ControllerName\ProgramName.TagName. For tag-based alarms, the Alarm Name appears as ::ControllerName\ProgramName.TagName.@Alarms.AlarmName. If the tag is not located inside a program, this part is omitted and the Alarm Name appears as ::ControllerName.TagName.@Alarms.AlarmName. | |
 | Buttons to shelve and unshelve the alarm condition selected in the Details pane. The Details pane appears at the bottom of the Alarm Manager table. | |
 | Shelve shelves the alarm condition selected in the Details pane. Shelving a condition prevents notification of new state changes to the alarm. | |
 | Unshelve unshelves the alarm condition selected in the Details pane. Unshelving a condition allows notification of new state changes to the alarm. | |
 | In the list of conditions, select a condition to show all of the details for that conditionin the Details pane. For example, to show details for the TRIP condition for the selected alarm, scroll to and tap TRIP. | |
 | Filter list. Select a filter on the HMI device to list only the alarms containing the filter value for the indicated column. For example, if the filter exists, select the filter Priority:High to show only those alarms with a high priority. Filters are configured in View Designer . | |
 | Buttons to perform operations on alarms in the Alarm Manager table: | |
 | Back opens the previously displayed screen. When opening the Alarm Manager screen from the Alarm Summary screen, this button reopens the Alarm Summary screen. | |
 | Details hides or shows the Details pane, which contains the details of the last selected alarm. The Details pane appears on the bottom half of large alarm tables and replaces the list of alarms in medium alarm tables. If no alarm is selected, the Details pane is empty. | |
 | Select All selects all of the alarms in the alarm table, including those not displayed on the current page of alarms. | |
 | Deselect All deselects all alarms in the alarm table, including those not displayed on the current page of alarms. | |
 | Select Page selects all of the alarms displayed on the current page of alarms. | |
 | Reset Alarm Counts resets the alarm count in the controllers and the Alarm Count value in the Details pane of the Alarm Manager table to zero. The reset is performed for all conditions of the currently selected alarm. | |
 | Enable enables the selected alarms in the Alarm Manager | |
 | Disable stops the alarm condition from being evaluated. In effect, this turns off the selected alarm. This button disables the entire alarm. It is not possible to disable an individual alarm condition. | |
| Unshelve unshelves the selected alarm in the Alarm Manager table. Unshelving allows notification of new state changes to alarms. From the condition list in the Details pane of the Alarm Manager table, unshelve individual alarm conditions. | |
| Shelve prevents the notification of new state changes to the selected alarm if the alarm is acknowledged. Updates to the alarm do not appear. The alarm remains shelved until the shelve duration from the controller expires automatically or until manually unshelving the alarm. Updates to the alarm then resume. Shelving an alarm in the Alarm Summary table shelves only the selected alarm conditions. Shelving an alarm in the Alarm Manager table shelves all of the conditions of the alarm. From the condition list in the Details pane of the Alarm Manager table, shelve individual alarm conditions. Change the Shelve Duration and Max Shelve Duration using Logix Designer . Change the Shelve Duration and Max Shelve Duration values using Logix Designer in order to propagate updated values to the Alarm Summary and Alarm Manager clients. Use the previous Shelve Duration and Max Shelve Duration values when shelving alarms in Studio 5000 alarm tables. | |
 | Help opens the Help popup. This popup displays a legend of icons for In Alarm/Unacknowledged, Normal/Unacknowledged, In Alarm/Acknowledged, and Faulted alarms, and the task each button on an alarm table performs. | |
 | The Details pane lists condition details for the selected alarm. Each row lists details for one alarm condition. The details include when the alarm condition was enabled or disabled, suppressed or unsuppressed, or shelved. Selecting multiple alarms in the Alarm Manager table shows condition details for the last alarm selected. | |
Provide Feedback