Creating CIP Consume Links
CIP
Consume LinksFor a controller, define up to 128
CIP™
consume links for receiving data from remote controllers across a CIP
network. Add one consume link per controller requiring CIP
communications. When defining a CIP
consume link, specify the Ethernet port connecting to the CIP
network with the remote controller.
TIP:
When configuring a
CIP
consume
link, define the producer name and the CIP
path to the producer. If
the IP address of the producer is modified, update the path to the producer.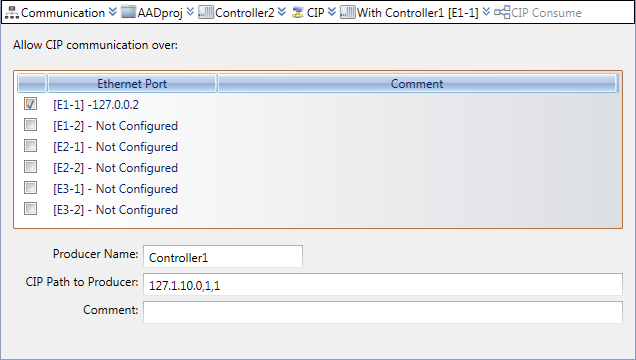
Then map consumer variables.
To create
CIP
consume links- In theCommunication View, expand the required controller, right-clickCIP, and then clickAdd CIP Consume Link.TheWith Unnamedx (Not configured)link andCIP Consumeitem are added to theCommunication Viewtree structure.
- Configure theCIPconsume link:
- Double-click the WithUnnamedx (Not configured)link to display theCommunicationproperty page.
- From the property page, select the Ethernet port to use for communication with theCIPnetwork.TIP: Your specified Ethernet ports also apply to theCIPProduce Link and to all otherCIPConsume Links of this controller.
- In theProducer Namefield, indicate the name of theCIPproducer from which the consumer receives data.
- In theCIP Path to Producerfield, type theCIPpath to the controller. The path uses the following format:IP_address,port,slotwhereIP_addressis the address of theCIPEthernet module in the system.portis the communications route from the remote controller. ForControlLogix®controllers, the port should always be 1 specifying theControlLogixbackplane. Other numbers specify different communications routes fromControlLogix.slotis the number of the slot where the CPU module is installed. These slots start from 0 and are numbered from left to right.
Provide Feedback