Contacts
Contacts are graphic components of Ladder Diagram (LD) diagrams.
Depending on the type of contact, it represents the value or function of an input or
internal variable.
Contact types available from the LD stencil are:
- Direct Contact
- Reverse Contact
- Pulse Rising Edge Contact
- Pulse Falling Edge Contact
Change the type of a contact at any time after insertion.
When inserting
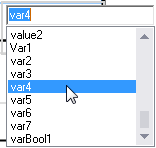
contacts in program organization units (POUs), assign variables using the Variable Selector.
Names of assigned variables display above the contact elements within POUs. Replace existing
variables by double-clicking the variable names to access the Variable Selector or by
single-clicking variable names to select from drop-down combo boxes containing the global
and local variables. Also single-click existing variables, then type literal values in the
text boxes provided. When inserting literal values beginning with a letter or an underscore,
enclose the variable name in single quotes as follows: 'abc'.
Select a variable from the drop-down combo-box: | Type a literal value in the text box: |
 | 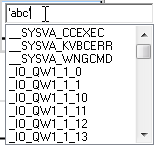 |
When selecting items like local variables, controller variables, system variables,
and defined words from the drop-down combo box, type characters in the text box to focus on
the possible items.
While dragging contacts from either the toolbox or within a
diagram, the language editor displays the possible drop points. Drop points display as plus
signs in a black circle. For elements, the possible drop points display on the
rung.
Drop points on a rung while dragging elements over the rung

Task | Procedure |
|---|---|
Insert a contact |
|
Insert a parallel contact |
|
Drag a contact |
|
Change the type of a contact |
|
Provide Feedback