Calibrate the touch screen
Calibrate touch screens for proper use. When touching an input element and no action or an unexpected action occurs, the touch screen does not calibrate properly. Calibrating the touch screen may take several tries before it is successful. Calibration is retained after a reboot or a power cycle. To prevent damage to the touch screen, use a finger or plastic stylus device with a minimum tip radius of 1.3 millimeters or 0.051 inches.
TIP:
Do not perform touch screen calibration from a screen that has a trend chart or an event triggered by a state change. While the touch screen calibrates, traces on a trend chart do not update with new data values and events do not write to tag values.
To calibrate the touch screen
- On the HMI device or in theSystem Banner, selectNavigation
 and then select Settings.
 - SelectDisplay. TheDisplaypopup opens.
- SelectCalibrate Touch. A red target appears on the screen:
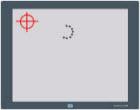
- Press and hold the center of the target until the target turns white and another red target appears:
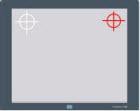
- Continue pressing and holding the centers of all remaining targets as they appear. All processed targets turn white. After the target in the center of the screen turns white, a green check mark indicates a successful calibration. Successful calibration is saved automatically.TIP:If a calibration fails, a red circle with an X appears and the calibration process begins again, with the first target in the upper left corner of the screen. If calibration does not complete, theDisplaypopup opens.
- SelectClose
 .
.
Provide Feedback