Keys
To access the Keys menu, go to the Configure section in the left hand panel and click on Settings. Click the Keys tab located at the top of the page. The Active Keys table will display. Within the Keys tabs you will have options to view Active Keys, All Keys or Providers. Analytics Security Provider can have several Active and Passive keys. The active keys are used to create new signatures, while the passive keys can be used to verify previous signatures. This makes it possible to regularly rotate the keys without any downtime or interruption to users.
Keys
Rotating Keys
It is recommend that you regularly rotate keys. To do this, create new keys adding them with a higher priority than the existing active keys in your system. You can also create new keys with the same priority as the existing keys which will make the existing keys passive. Once you add new keys you can delete the older keys.
TIP:
As a guideline, it may be a good idea to create new keys every 3-6 months and delete old keys 1-2 months after the new keys where created.
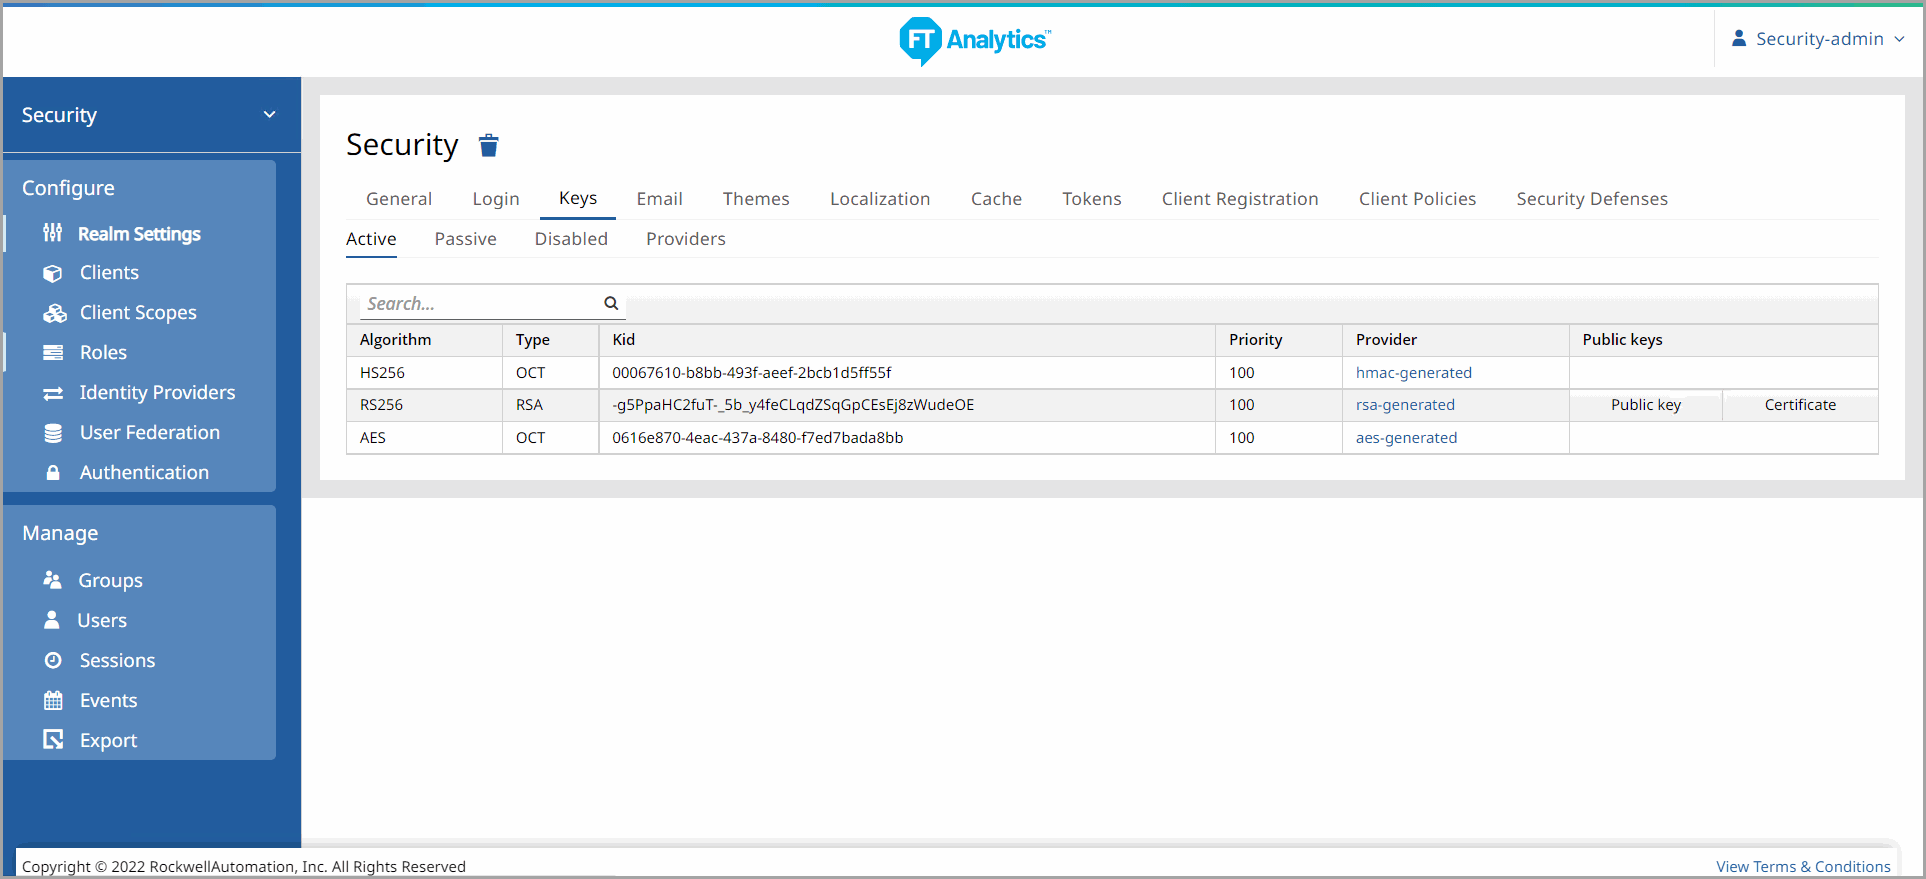
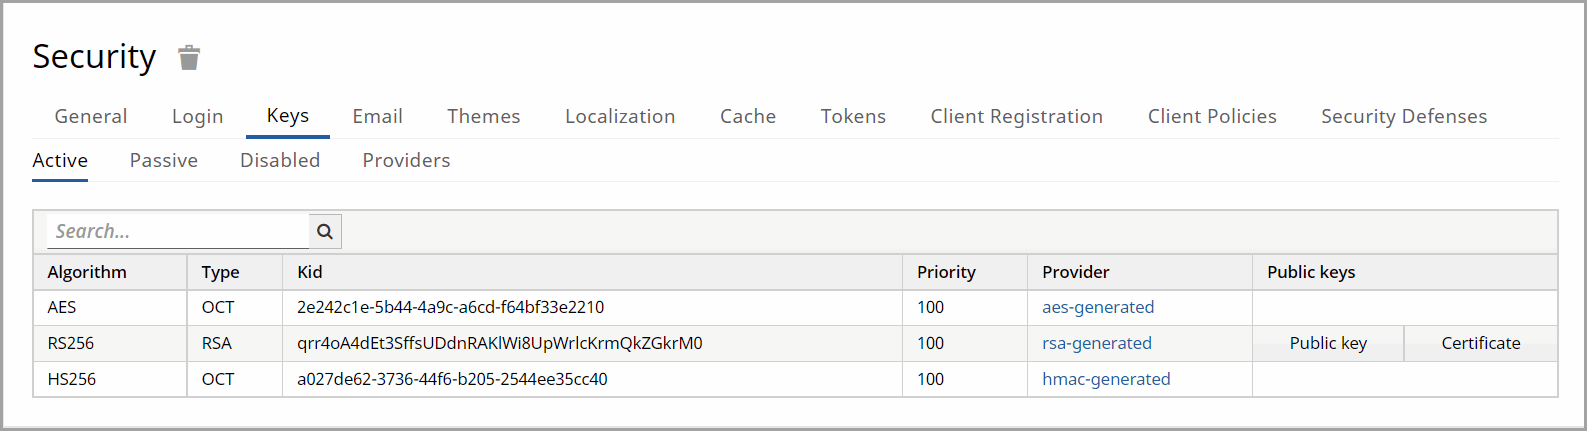
Active
- Currently active keys are displayed in this table.- Algorithm: Significant Algorithm for a particular active keypairs.
- Type: The type of key.
- KID: The key ID.
- Priority: Priority for the provider.
- Provider: The Provider of the key.
- Public Keys - Click [Public key] to display the Public key. Click [Certificate] to display the Certificate.
Active
Passive
- Currently, passive keys are displayed in this table Type: The type of key.
Status: Status of the keys if they can be used for signing.
KID: The key ID.
Priority: Priority for the provider.
Provider: The Provider of the key.
Public Keys - Click [Public key] to display the Public key. Click [Certificate] to display the Certificate.
Passive

Disabled

Providers
- Click the Providers tab to view the list of Provider keys. You can also click the Providers listed in the Active or All tables to view specific information for each Provider. In the Provider table, you will find the following information:- Name: The name of the Provider.
- Provider: The Provider.
- Provider description: The description about the provider.
- Priority: The priority of the Provider.
- Actions: Click [Edit] to edit a Provider and click [Delete] to delete a Provider.
Providers

Click on the desired name link to modify the keystore and provide the following information:
AES Generated
:- Console Display Name: Enter the display name of the Provider when linked to the Admin Console.
- Priority: Enter the priority for the Provider.
- Enabled: Set to OFF if you want the keys to be disabled. You can also delete the Provider using the delete feature in the Provider table.
- Active: Set to Active if you want the keys to be used for signing. If the Active setting is switched to OFF, the keys will no longer be active and can only be used for verifying signatures.
- AES Key Size: Size in bytes for the generated AES Key. Size 16 is for AES-128, Size 24 for AES-192 and Size 32 for AES-256.WARNING: Bigger keys then 128 bits are not allowed on some JDK implementations.
RSA Generated:
- Console Display Name: Enter the display name of the Provider when linked to the Admin Console.
- Priority: Enter the priority for the Provider.
- Enabled: Set to OFF if you want the keys to be disabled. You can also delete the Provider using the delete feature in the Provider table.
- Active: Set to Active if you want the keys to be used for signing. If the Active setting is switched to OFF, the keys will no longer be active and can only be used for verifying signatures.
- Algorithm: Intended algorithm for the key.
- Key Size: Size for the generated keys.
HMAC Generated:
- Console Display Name: Enter the display name of the Provider when linked to the Admin Console.
- Priority: Enter the priority for the Provider.
- Enabled: Set to OFF if you want the keys to be disabled. You can also delete the Provider using the delete feature in the Provider table.
- Active: Set to Active if you want the keys to be used for signing. If the Active setting is switched to OFF, the keys will no longer be active and can only be used for verifying signatures.
- Secret Size: Size in bytes for the generated secret.
- Algorithm: Intended algorithm for the key.Modify Keystore
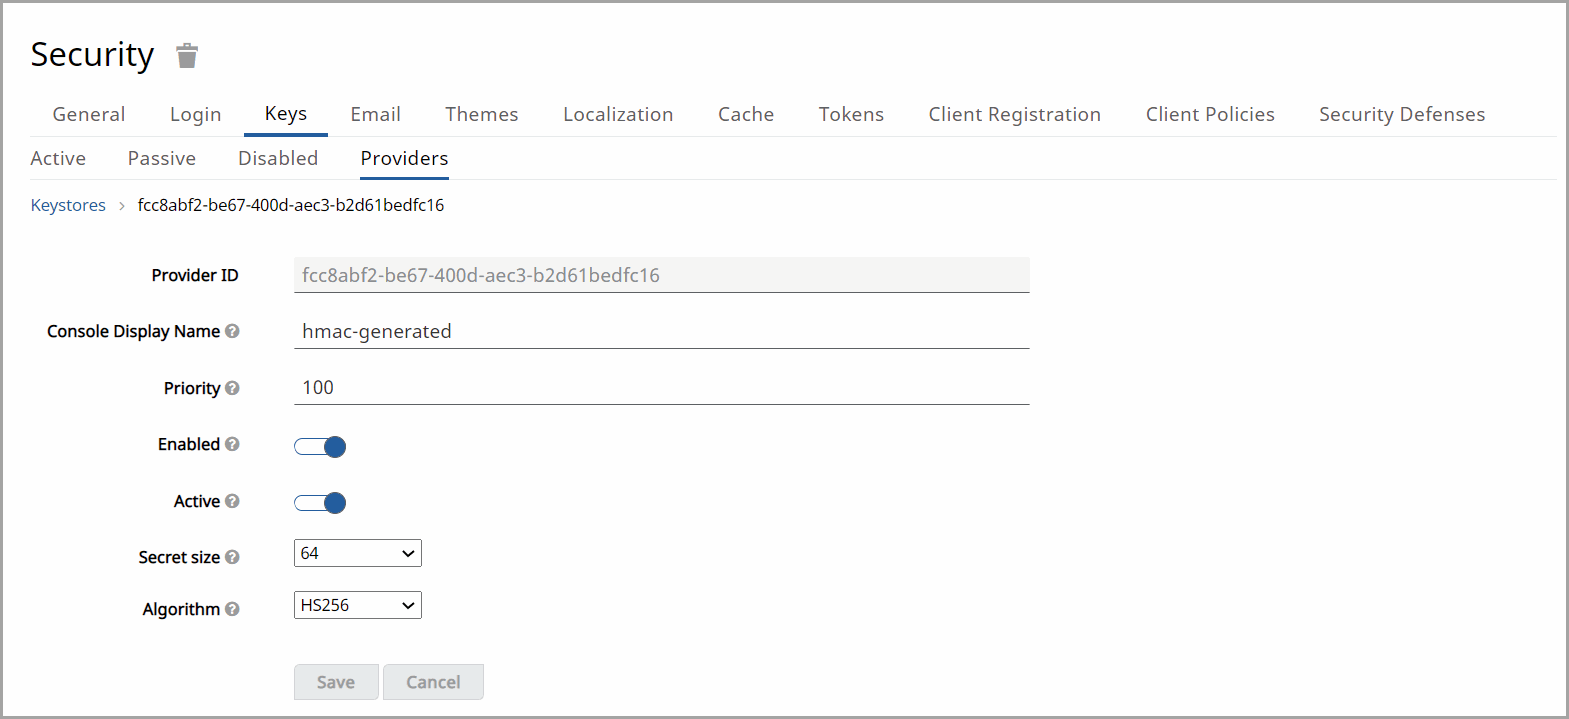
Click [Save] once you are ready to add the keystore.
Click [Cancel] if you wish to discard the keystore.
Keystores
: Log in as the Master Admin user to add keystores.Add Keystore

rsa-generated keys:
To add a new key, choose rsa-generated from the drop-down. Remember to change the priority if you want to make this keypair Active. You can also change the keysize (the default is 2048). Click [Save] to add the new key. This will also generate a self-signed certificate.rsa keys:
To add a key and certificate obtained elsewhere, choose rsa from the drop-down. Remember to change the priority if you want to make this keypair Active. Click on Select file for Private Key to upload your private key. This file should be encoded in PEM format. There is no need to upload the public key because it is automatically extracted from the private key. If you have a signed certificate for the keys, click on Select file next to X509 Certificate. If you do not have one, you can skip this step and a self-signed certificate will be generated for you.Java Keystore:
To add a key and certificate stored in a Java Keystore file on the host, choose java-keystore from the drop-down. Remember to change the priority if you want to make this keypair Active. You must also fill in the values for Keystore, Keystore Password, Key Alias, and Key Password. Then click [Save].
NOTE:
The Providers give you a way to select different types of keystores. The ones that end in “-generated” are the ones that are built into Analytics Security Provider (aes-generated, HMAC-generated, rsa-generated). The others allow you to load keys from external files.
Keystore

Provide Feedback