Coils
Coils are graphic components of Ladder Diagram (LD) programs and represent the assignment of Boolean outputs. In an LD program, a coil represents an action. It must be connected on the left to a Boolean symbol, such as a contact or the Boolean output of a block.
These types of coils are available from the LD stencil:
- Direct Coil
- Reverse Coil
- Pulse Rising Edge Coil
- Pulse Falling Edge Coil
- Set Coil
- Reset Coil
Change the type of a coil at any time after insertion.
When inserting coils in POUs, assign variables using the
Variable Selector
. Names of assigned variables display above the coil elements within program organization units (POUs). Replace existing variables by double-clicking the variable names to access the Variable Selector
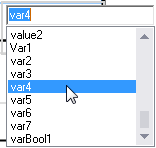
or by single-clicking variable names to select from drop-down combo boxes containing the global and local variables. Also, single-click existing variables, then type literal values in the text boxes provided. When inserting literal values beginning with a letter or an underscore, enclose the variable name in single quotes as follows: 'abc'. - Select a variable from the drop-down combo-box:
- Type a literal value in the text box:
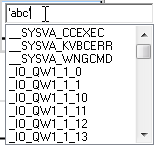
When selecting items such as local variables, controller variables, system variables, and defined words from the drop-down combo box, typing characters in the text box focuses on the possible items. Focus on listed items by typing letters, digits, and specific special characters: !, #, $, %, &, \, *, +, -, ,/ <, :, =, >, ?, @, \, ^, _, `, |, and ~.
Align the coils of all rungs making up diagrams to improve readability.
While dragging coils from either the toolbox or within a diagram, the language editor displays the possible drop points. Drop points are displayed as plus signs in a black circle. For elements, the possible drop points are displayed on the rung. For instance, since a rung can only have one coil on the right, the editor does not display possibilities when dragging another coil onto the rung. However, if a parallel branch is placed around the coil, the editor displays a possible location for another coil on the branch.
Drop points on a rung while dragging elements over the rung:

TIP:
When dragging coils, the possible drop points on a rung
are displayed while moving over the rung.
Task | Procedure |
|---|---|
Drag a coil | To reposition a coil within the diagram, select the coil while holding down the left mouse button, then drag the coil to the required location on a rung where a drop point is displayed. |
Insert a coil |
|
Insert a parallel coil | While inserting or dragging an element, drop points indicate the possible locations where the element can be placed on a rung.
|
Change the type of a coil in LD | In the language container, select the coil, and then press the space bar. |
Align all coils in a diagram |
|
Provide Feedback