Downloads
What is this for?
Sometimes there is a need to send data from one controller to another and be confident the data being sent/ received is accurate and not a combination of old and new data. This application note shows how to send one (500byte) packet of buffered data using a Produce / Consume (Class 1) connection over Ethernet/IP.
General Features
- Data Buffer
- Handshake
Advantages: This sequence facilitates the implementation and quick configuration when is need it to send one packet of buffered data using a Produce / Consume (Class 1) connection over Ethernet/IP, without any other hardware.
Limitations/Disadvantages: This sequence is available for CompactLogix / ControlLogix Controllers.
Need Help?
If you need help with an application or have feedback from the Innovation Center, please contact us.
Is this helpful?
This code is defined for applications when it is needed to send one packet of buffered data over Ethernet/IP.
Application areas: Food, Manufacturing, Beverage
How can I get this working?
- Hardware
- Personal computer with an available USB port
- CompactLogix, ControlLogix Controller
- Software
- Studio 5000, version 21 or later
- Previous knowledge:
- Intermediate knowledge of programming and configuration in Studio 5000 software: Ladder language (LD)
Implementation Guide
Step 01
Next steps offer an explication on the code and how buffer of data before sending it to another controller and using handshaking numbers (#’s) to indicate when a new packet of data has arrived.
Buffering of data: One reason for buffering data would be to keep a running list of data before transferring in case there is a communication failure. Another reason would be to make sure the data packet you are creating is complete. In this example I am buffering 10 (492byte) packets in a first in / first out fashion. If this is too much data buffering, this can be customized to your application.
Handshaking is used to indicate when there is a new packet of data being sent/ received. Some applications use what is called a footer # at the end of the packet, other applications use a header # at the beginning of the packet. In this example, I am using both a header and footer #. The basic operation of this is as follows; every time a new packet of data is ready to be sent, the incremented header and footer #’s are attached to the beginning and end of the (492byte) packet of data, making it a full (500byte) produce/ consume packet, when the other controller sees there is a difference between the old header/ footer # and the new header/ footer # it knows this is a new packet of data and buffers it in its memory. This new header / footer # is stored to be checked later when a new packet is sent again. This is taken one step further by introducing a bidirectional handshaking method. This means I am sending either the header or footer # back to the producer of the data as a trigger to send another packet.
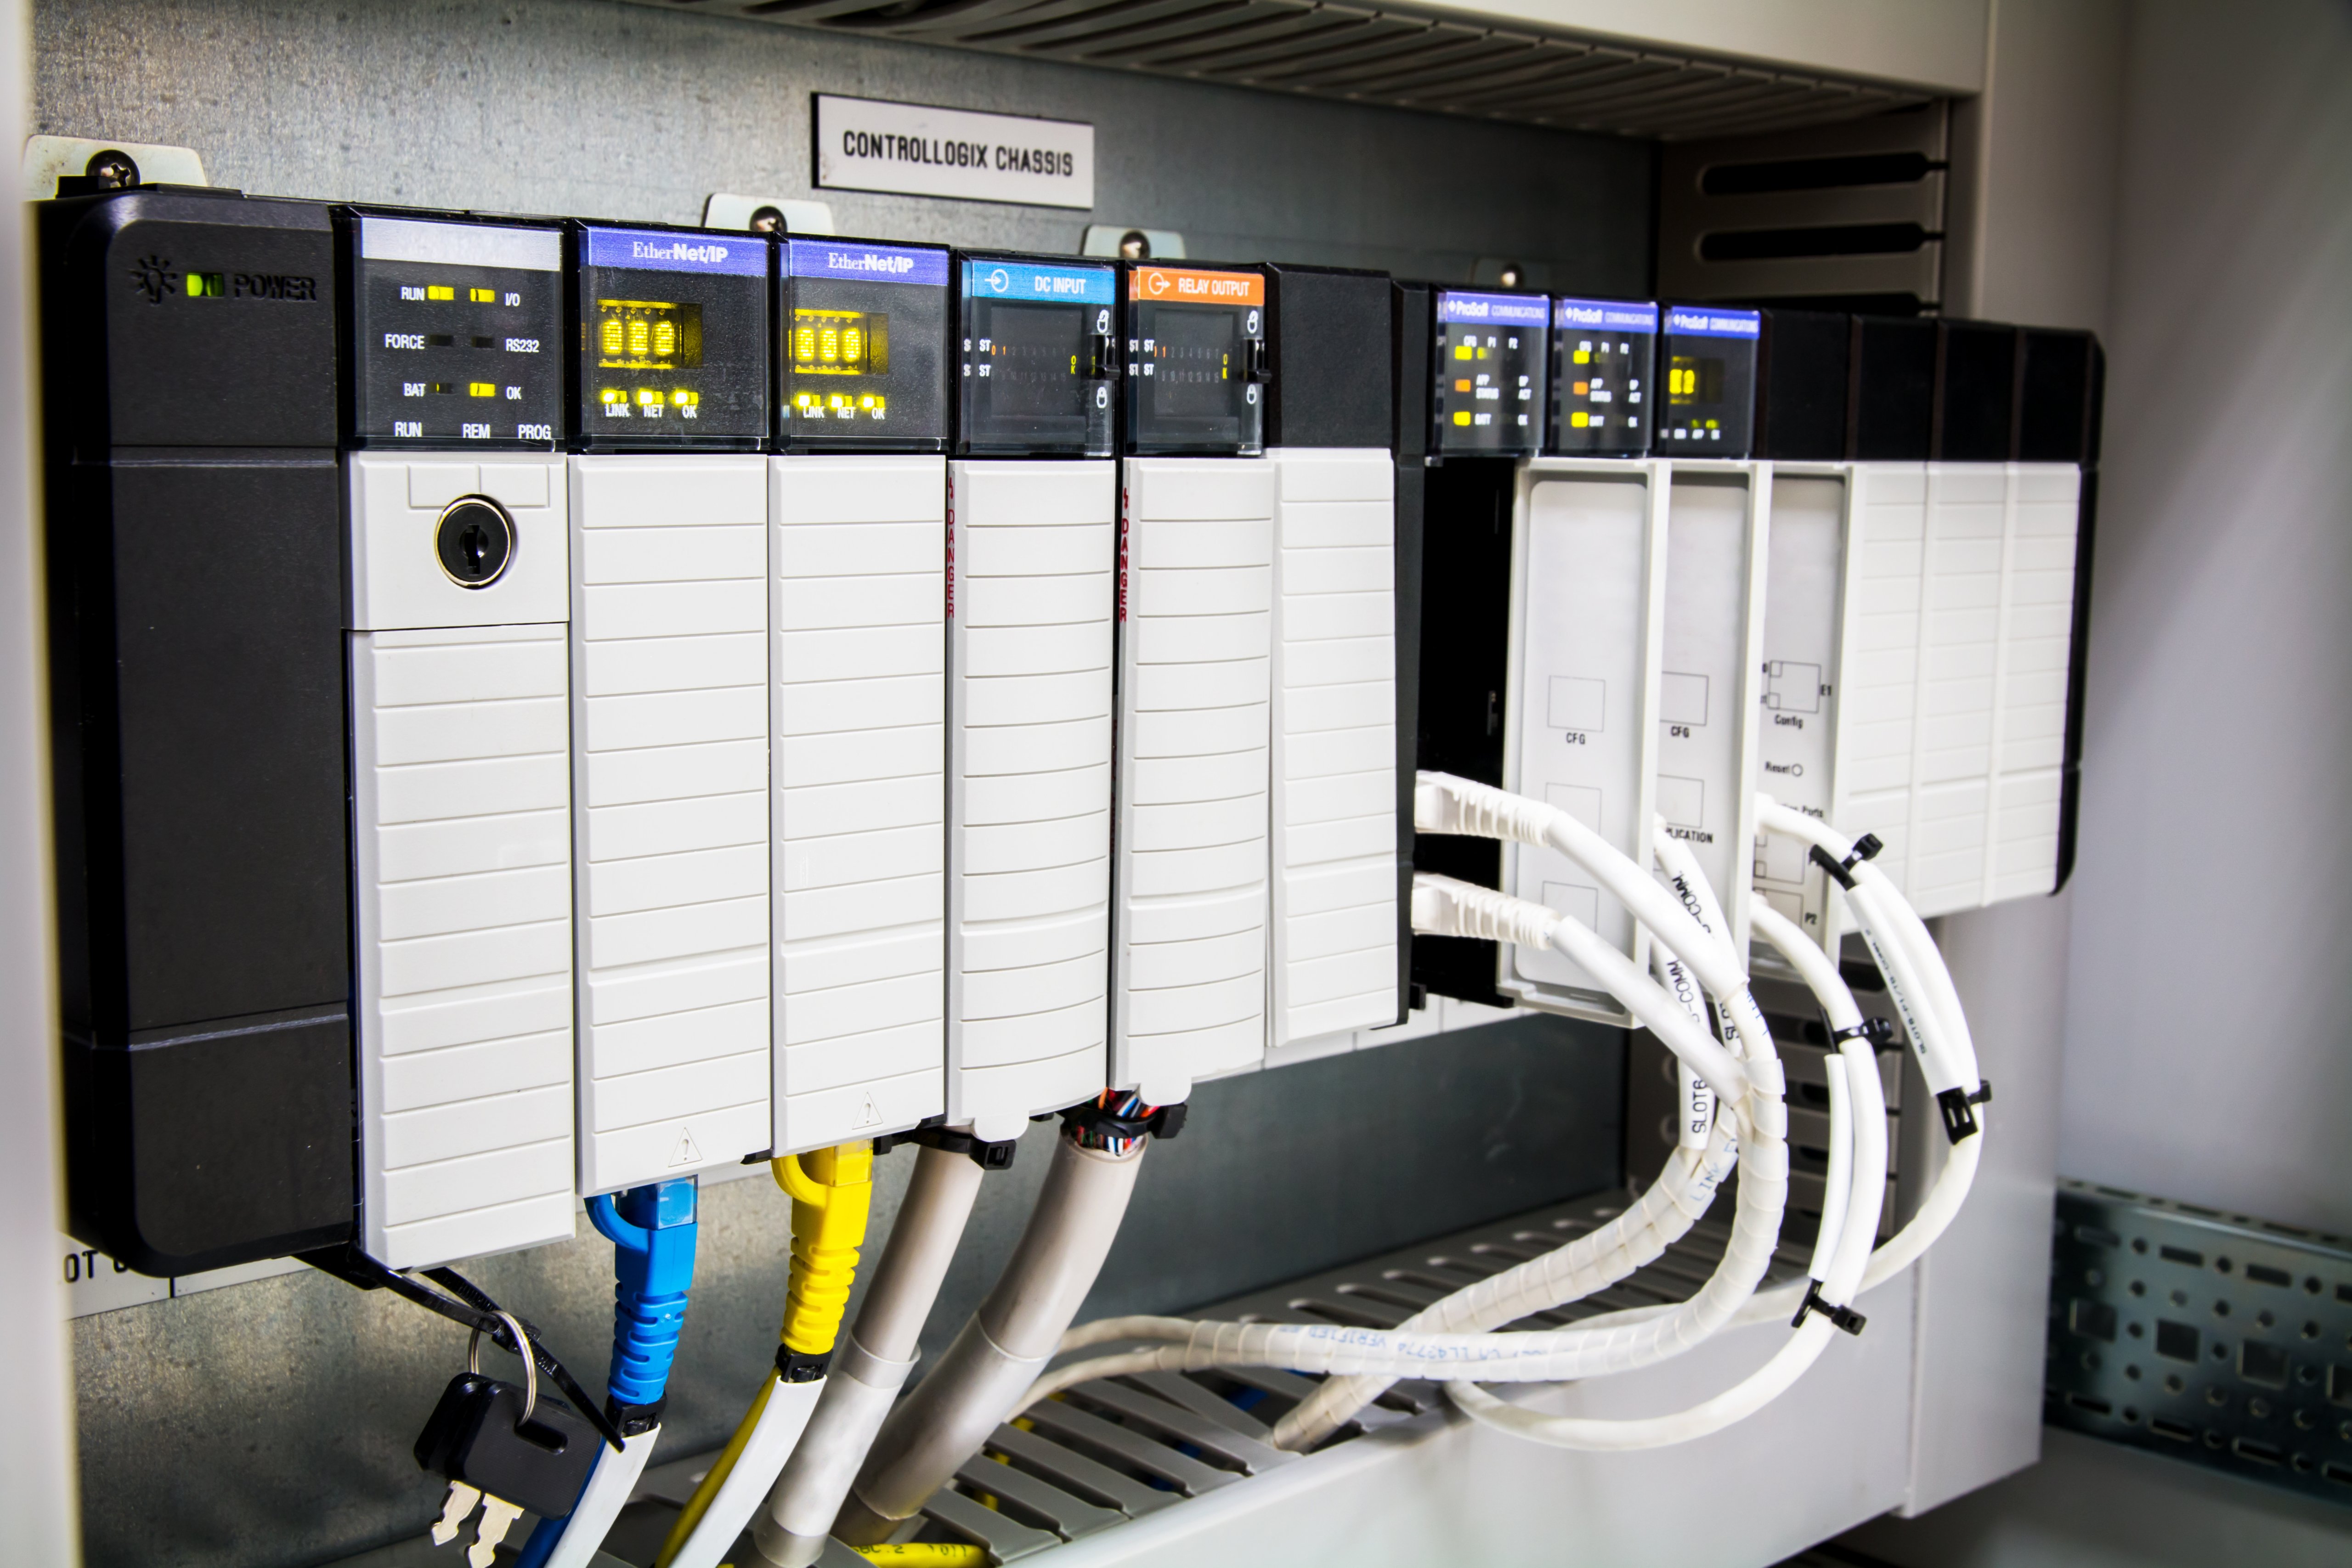
send-data-between-controllers-with-handshake-in-studio-5000_Step 1-Image1
There are two Control Logix programs, one program produces data, and the other program consumes data. The program that is producing data is called CLX1_producing_ data_with_handshaking_ and_Buffering1. The program that consumes data is called CLX2_consuming_data_with_handshaking. They will be referenced as program CLX1_Produce and CLX2_Consume.
Data must be collected and buffered before sending it to the produced tag.
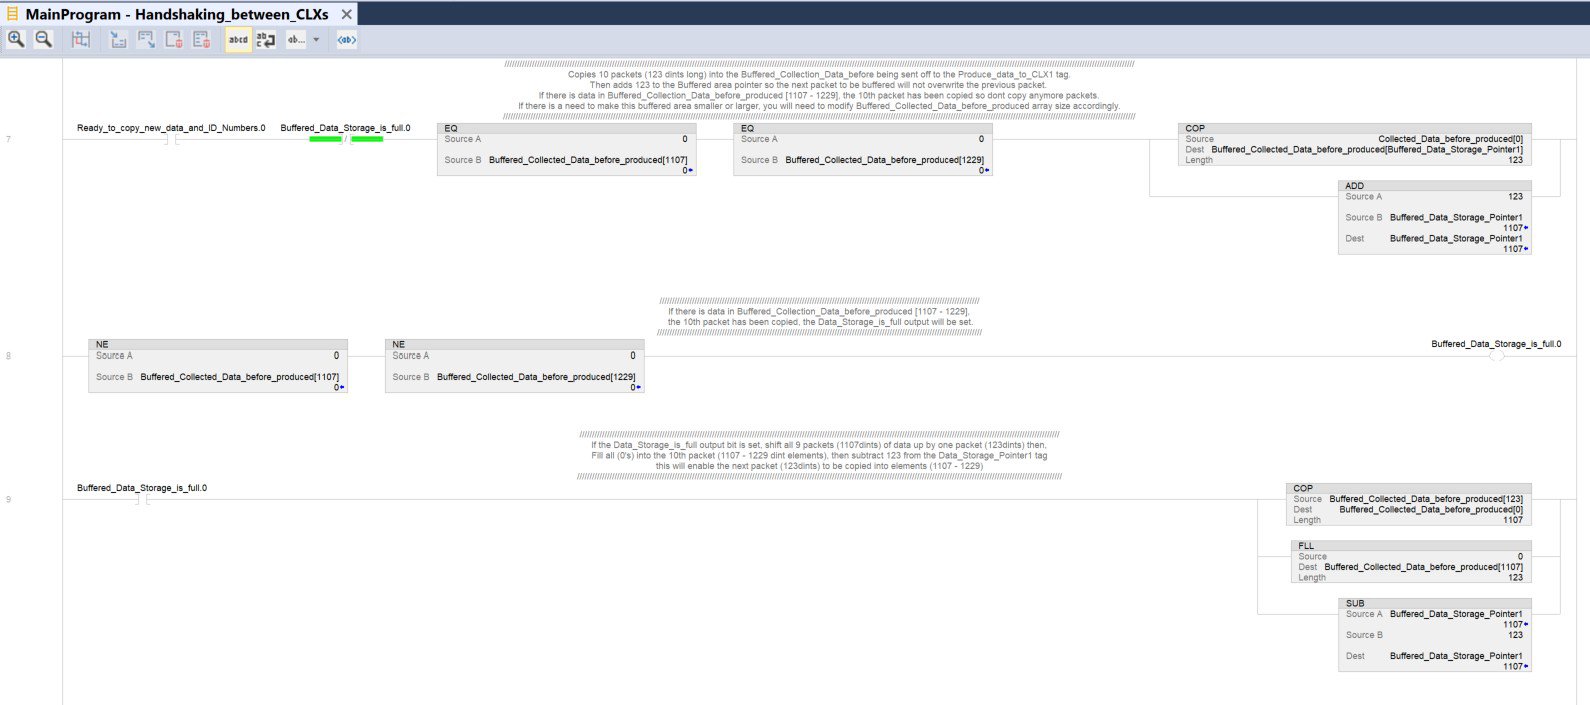
Refer to CLX1_produced program Rungs 7, 8, and 9.
Rung 7. Data is collected and buffered in a First in First out manner. In this example I am buffering 10 (123dint) data chunks (1 – 10). If there is no data in the 10th buffered data chunk, add 123 to the Buffered data pointer, if there is data there, stop filling the Buffered register.
Rung 8. When data appears in the 10th (123dint data chunk buffered register, The buffered register area is full and will set the Buffer full output.
Rung 9. If Buffer full output is set, shift Buffered data chunks 2 – 10 up by (123dints). Then fill the 10th buffered data chunk with zeros.
Step 02
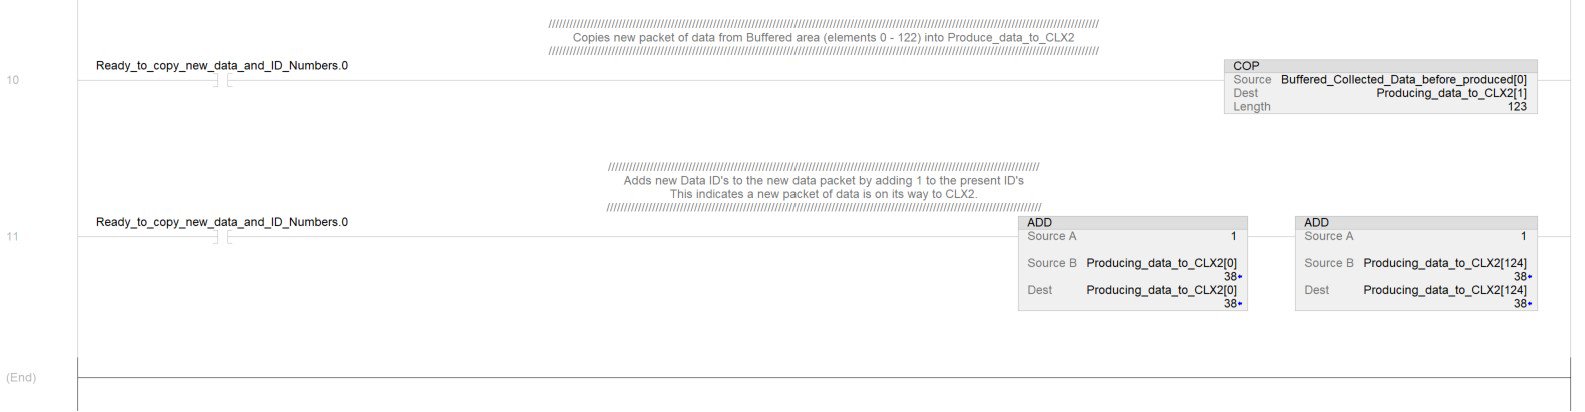
Now that we have data buffered, start producing this data on the Ethernet network. Refer to CLX1_produced program Rungs 10, 11.
Rung 10. Will copy the first chunk of data from the Buffer to the produced tag.
Rung 11. Will assign a Header and Footer ID #. These numbers will range from (0 – 100). These ID’s will also be used as the handshaking numbers between the two CLX processors. The next scan through the ID’s will be increased by 1.
At this point the packet is formed and looks like this:
- Producing_data_to_CLX1
- [0] = Header ID#
- [1] - [123] = Data
- [124] = Footer ID#
send-data-between-controllers-with-handshake-in-studio-5000_Step2-Image1
- Producing_data_to_CLX1
Step 03
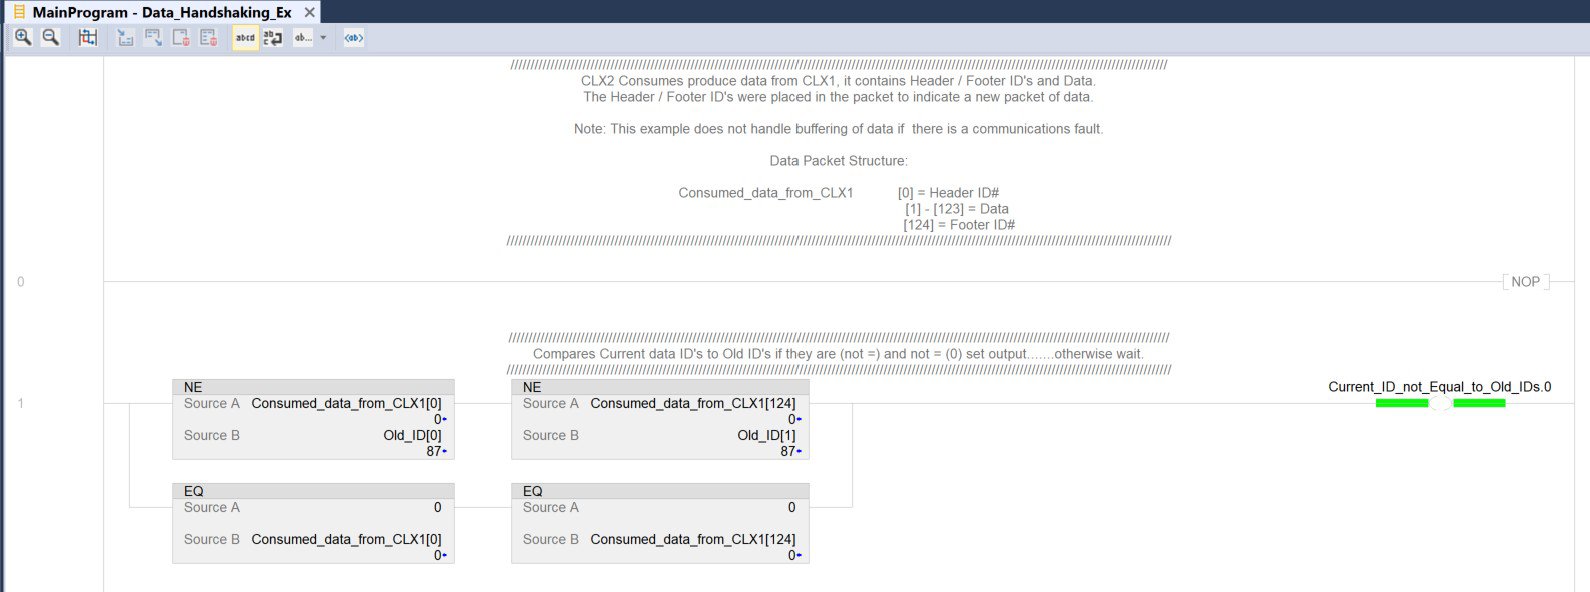
The data is being consumed by another CLX2 processor over Ethernet. The consumed tag looks like this:
- Consumed_data_from_CLX1
- [0] = Header ID#
- [1] - [123] = Data
- [124] = Footer ID#
Refer to CLX2_consumed program Rung 1.
Rung 1. Compares the New ID’s assigned in Step 2 Rung 11 to the old ID’s Buffered in Step 6 Rung6. If the ID’s are different, it knows it is reading a new packet of data.
send-data-between-controllers-with-handshake-in-studio-5000_Step3-Image1
- Consumed_data_from_CLX1
Step 04
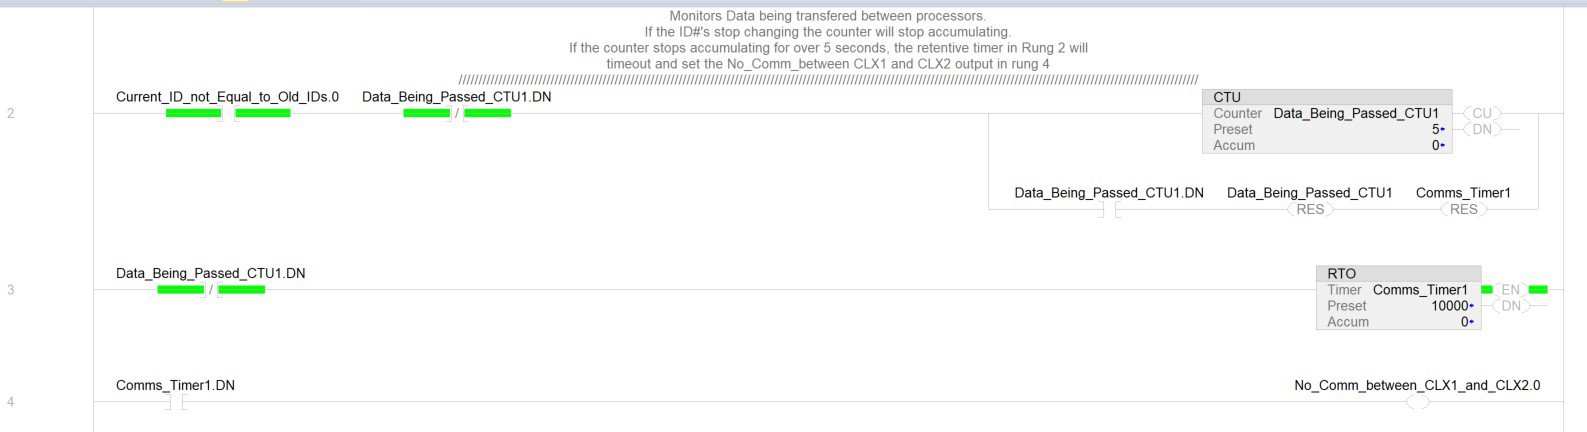
If the communications stop, the control needs to be aware of this, refer to CLX2_consumed program Rung 2, 3, and 4.
Rung2. Every time there is a different in ID’s seen the counter counts +1
Rung3. If the counter doesn’t get done within 5 sec. the retentive timer times out.
Rung4. If the retentive timer gets done, there have not been comms for over 5 sec and the no comms. between clx1 and clx2 output is set. This can be used as an alarm bit.
send-data-between-controllers-with-handshake-in-studio-5000_Step4-Image1
Step 05
Double checking that the Header and Footer ID’s did not change. Refer to CLX2_consumed program Rung 5.

send-data-between-controllers-with-handshake-in-studio-5000_Step5-Image1
Step 06
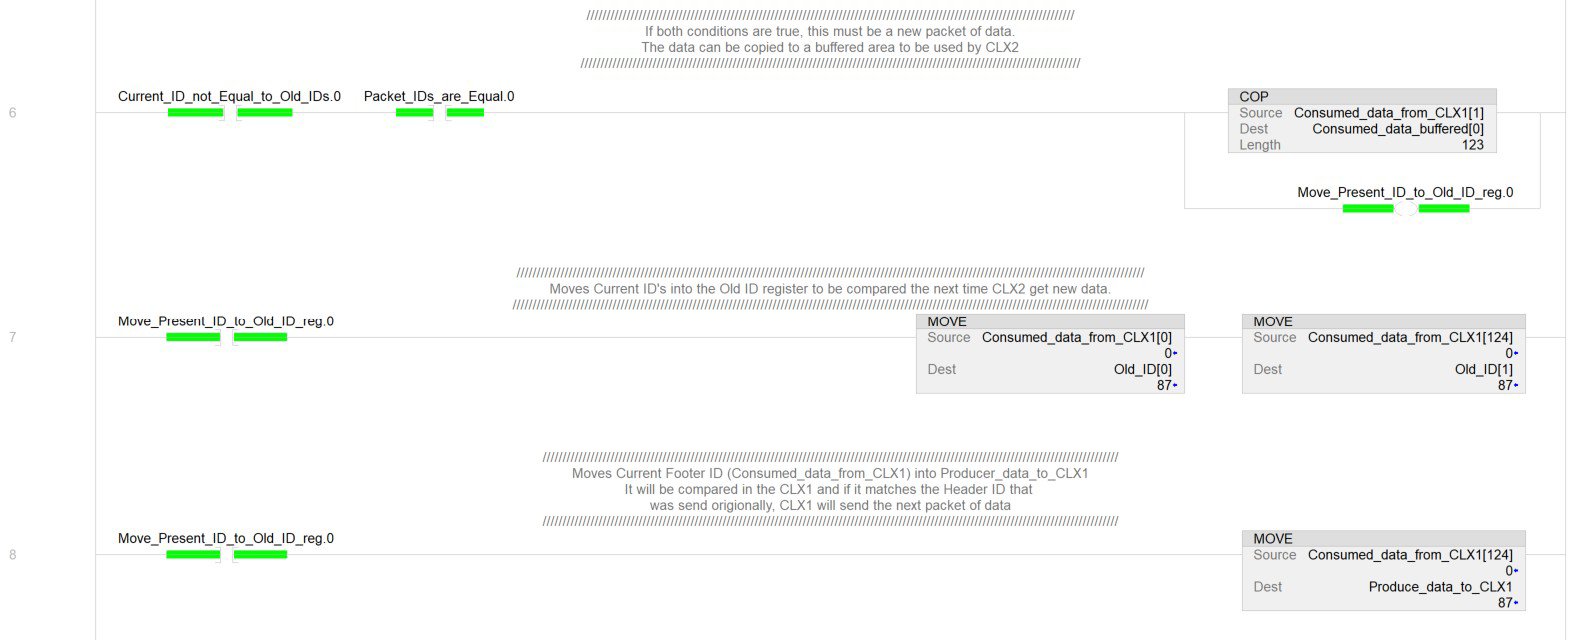
Now it's time to copy data from the consume tag to a different register in the CLX2, to be used in its program.
Next move the present header and footer ID #’s into the Old ID register to be compared later when the next packet of new data is sent over. Now for the handshaking portion of the program.
The Footer ID # is sent back to the CLX1, in a Produced tag, to act as the handshaking piece of data, which will be compared in the CLX1 as you will see in Step8. Refer to CLX2_consumed program Rung 6 to 8.
send-data-between-controllers-with-handshake-in-studio-5000_Step6-Image1
Step 07
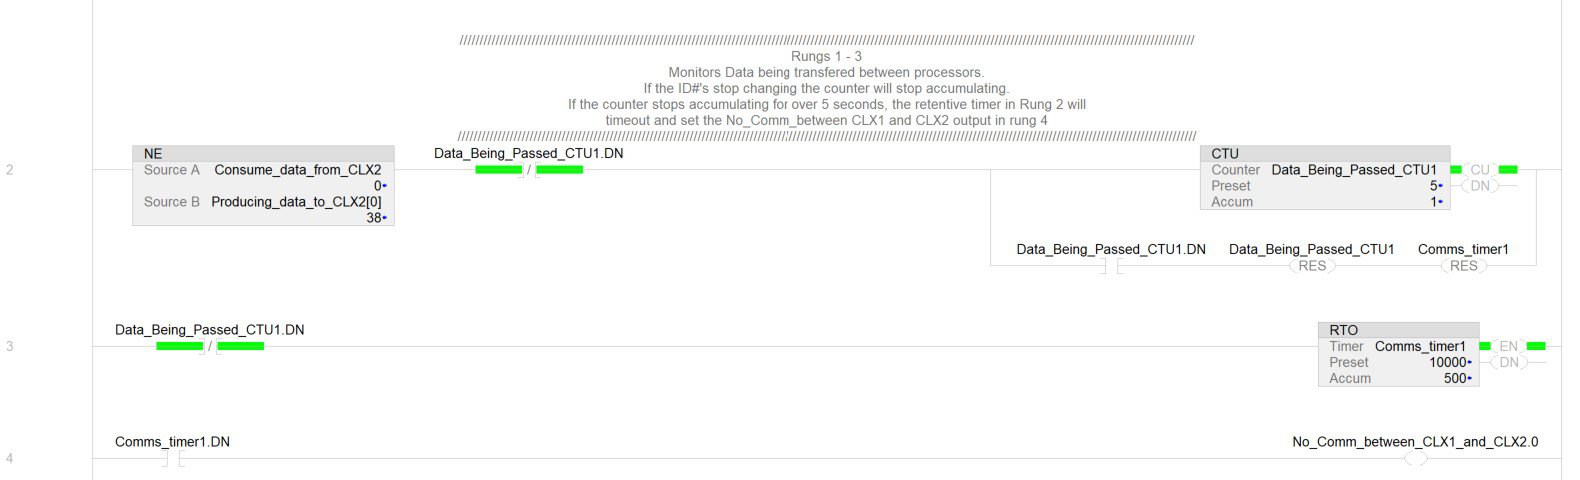
Once again if communications stop, the control needs to be aware of this. Refer to CLX1_produced program Rung 2, 3, and 4.
Rung2. Every time there is a different in ID’s seen the counter counts +1
Rung3. If the counter doesn’t get done within 5 sec. the retentive timer times out.
Rung4. If the retentive timer gets done, there have not been comms for over 5 sec and the no comms. between clx1 and clx2 output is set. This can be used as an alarm bit.
send-data-between-controllers-with-handshake-in-studio-5000_Step7-Image1
Step 08
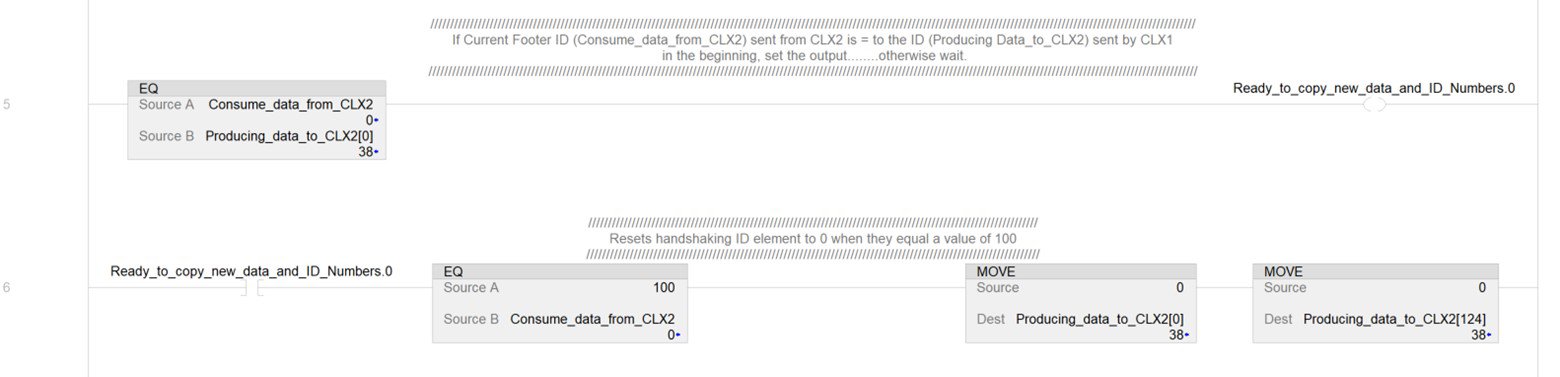
Referring to Step6, the footer ID # is being produced by CLX2 and will now be consumed by CLX1, if the initial produced ID # matches the now consumed ID #, there is still communications, the handshaking is complete, and CLX1 is now ready produce a new packet of data.
But before producing a new packet of data, we must examine if our ID # has reached 100, if so, reset back to 0, and start counting up to 100 again. Refer to CLX1_produced program Rung 5 and 6.
send-data-between-controllers-with-handshake-in-studio-5000_Step8-Image1
Send Data between Controllers with Handshake in Studio 5000
Version 1.0 - November 2024