Add an MSG_CIPSYMBOLIC function block, variables, and a contact
Use the following steps to add a MSG_CIPSYMBOLIC function block, input variables, and a contact to a ladder diagram.
To add an MSG_CIPSYMBOLIC function block, variables, and a contact
- Add a third rung by doing one of the following:
- FromToolbox, drag
 to the place under the second ladder rung.
 - Select the second rung, and then selectAlt+Shift+R.
- Add the MSG_CIPSYMBOLIC function block by doing one of the following:
- InToolbox, inSearch, enterMSG_CIPSYMBOLIC, and then drag it to a valid location on the third ladder rung.
- Select the third rung, and then inToolbox, double-clickMSG_CIPSYMBOLIC. TheMSG_CIPSYMBOLICfunction block is added to a valid location on the third ladder rung.
- Create variables.
- On theMSG_CIPSYMBOLICfunction block, right-click each variable, and then selectNew variablefor each parameter.
- InNew variable, enter the variable name for each parameter according to the following table.Parameters and variablesParameterVariable NameMSG_CIPSYMBOLICMSG_WriteVariableCtrlCfgA_CtrlCfgSymbolicCfgA_SymCfgTargetCfgA_TarCfgDataA_Data
- InProject Organizer, under your program, double-clickLocal Variablesto open the local variable grid.
- In the local variable grid, do the following:
- For the A_Data variable, double-click theDimensioncell, and then change the array size to [1...4].
- Configure the initial values for _CtrlCfg according to the following table.A_Data initial valuesParameterInitial ValueA_CtrlCfg.CancelLeave blankA_CtrlCfg.TriggerType300A_Ctrlcfg.StrModeLeave blank
- Configure the initial values for A_SymCfg according to the following table.A_SymCfg initial valuesParameterInitial ValueA_SymCfg.Service1A_SymCfg.Symbol'UDINT_FromA'A_SymCfg.CountLeave blankA_SymCfg.DataType200A_SymCfg.Offset200
- Configure the initial values for A_TarCfg according to the following table.A_TarCfg initial valuesParameterInitial ValueA_TarCfg.Path'4,192.168.1.19'A_TarCfg.CipConnMode1A_TarCfg.UcmmTimeout0A_TarCfg.ConnMsgTimeout0A_TarCfg.ConnCloseLeave blank
- Add a contact by doing one of the following:
- InToolbox, inSearch, enterXIC, and then drag it to the left of the MSG_CIPSYMBOLIC function block input on the third ladder rung.
- Select the third rung, and then inToolbox, double-clickXIC. The XIC is added to the left of the MSG_CIPSYMBOLIC function block input.
- Create a variable for the contact.
- On the third rung, right-click theXIC, and then selectNew variable.
- InNew variable, enter the variable nameWriteValue, and then selectCreate.
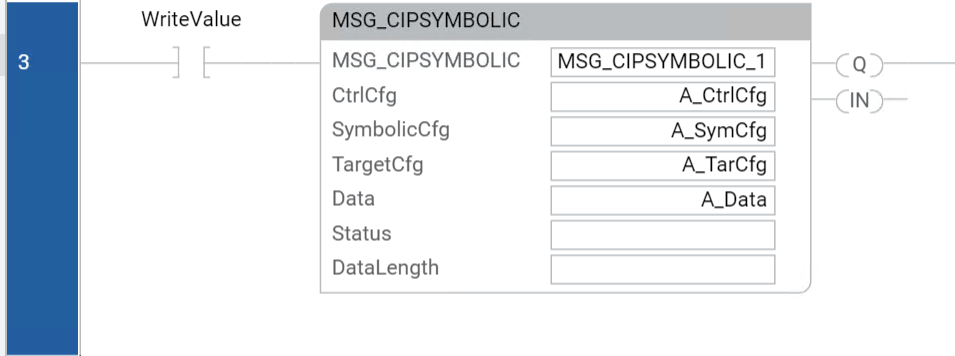
The third rung of your ladder diagram program looks similar to the following image:
Provide Feedback