Add a COP function block, variables, and a contact (MSG_CIPSYMBOLIC)
The COP instruction is used to convert the data you enter to the destination data type so the data is compatible with the controller variable.
To add a COP function block, variables, and a contact (MSG_CIPSYMBOLIC)
- Add a controller.
- InProject Organizer, selectNew device.
- InAdd device, select the checkbox beside the 2080-L50E0-48QVB controller.
- InSelection, enter a name for the controller, and then selectAdd.
- Add a ladder diagram program.
- InProject Organizer, expand the controller node.
- Right-clickPrograms, and then selectNew program.
- InNew program, in theNamebox, enterCIPSymbolicMessage.
- Verify that the program type isLadder Diagram.
- SelectCreate.
- Add a COP function block.
- InProject Organizer, double-clickCIPSymbolicMessageto open the program.
- InToolbox, inSearch, enterCOP, and then drag the function block to a valid location in the language editor or double-clickCOPto add it to the language editor.
- Add COP variables and initial values.
- InProject Organizer, under the program you created, double-clickLocal Variables.
- In the local variable gird, add variables according to the following table.COP variables and initial valuesParameterVariable NameData TypeSrcValueToWriteArray UDINTInitial value: 987654321SrcOffset0UINTDestA_DataArray USINTDestOffset0UINTLength4UINTSwapTRUEBOOLEANSTSCOPstsArray UINT
- Create arrays.
- For ValueToWrite, double-clickDimension, and then change the array size to [1..1].
- For A_Data, double-clickDimension, and then change the array size to [1..4].
- Add a contact.
- InToolbox, in theSearchbox, enterXIC.
- FromToolbox, drag the XIC to the left of the COP function block input on the first ladder rung.
- Right-click the XIC, and then selectNew variable.
- InNew variable, enter the variable nameConvert_Datafor the XIC, and then selectCreate.
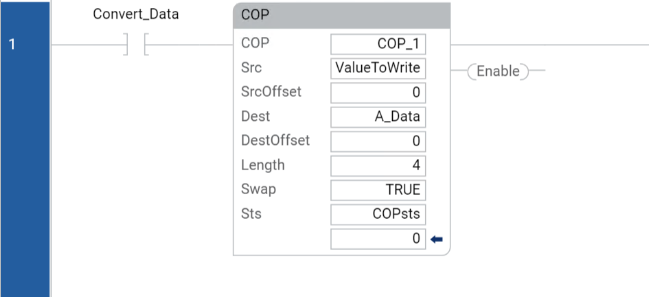
The first rung of your ladder diagram program for MSG_CIPSYMBOLIC messaging looks similar to the following image:
Provide Feedback