
Register an FactoryTalk View SE Connector
Perform the following steps to register a
FactoryTalk® View SE
extractor:- On the Management Console, select theExtractor Configurationstab.TheExtractor File Configurationspage will open, displaying a list of all available extractors.Extractor Configurations
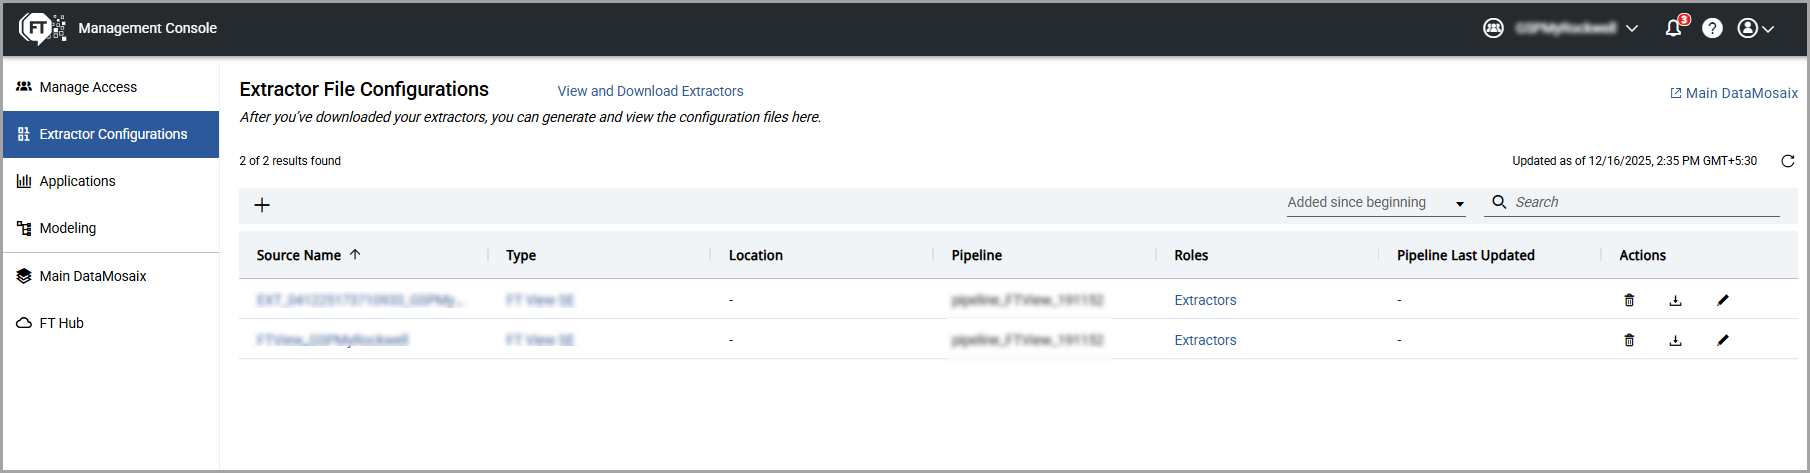
- Click the Add [
 ] icon.TheGenerate New Extractorpage is displayed.Generate New Extractor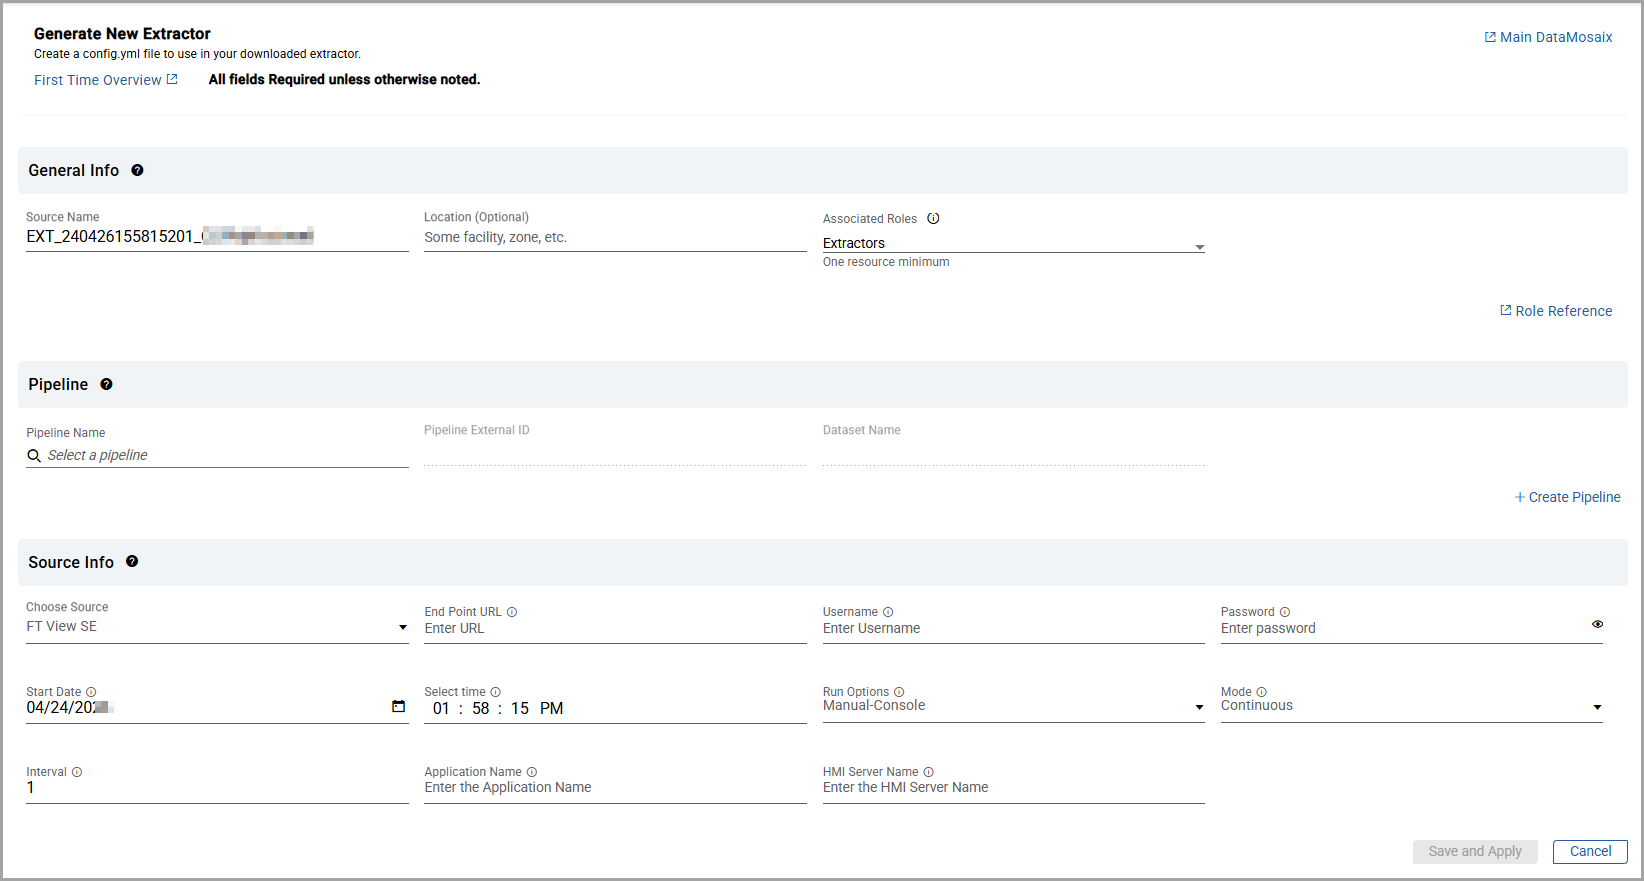
- In theGeneral Infosection, provide a unique name for your extractor in theSource Namefield. The source name works as the identifier for your extractor. You can search for an extractor using the source name. By default,FactoryTalk DataMosaix SaaSpopulates a source name.Source Name example: EXT_1406230728_createproject_v1.Here, EXT stands for the extractor, 140623 is the date in ddmmyy format, 0728 is the timestamp in hhmm format, and createproject_v1 is the project in which you are currently working. You can use the default source name or create your own.
- (Optional) Provide the location details. It can help you identify an extractor when you have many extractors for different plants/sites/locations.
- From theAssociated Rolesdrop-down list, select at least one role. You can refer to various roles and capabilities by clickingRole Reference.NOTE:The Associated Roles drop-down is visible and available only for Project Admin users or users within the Organization with a Project Admin Role assigned.You can select multiple roles from the Associated Roles drop-down list. In the search bar, you can search for any specific role from the list. If you want to apply all the roles to the application, select theSelect Allcheckbox.Next, you can select a pipeline or create a new pipeline. When you create a new pipeline, you have the option of selecting from an existing dataset or creating a new dataset.
- In thePipeline Namefield, search for a specific pipeline by entering the first characters and select a pipeline. On selecting a pipeline, thePipeline External IDandDataset Namefields are generated.To create a new pipeline, select the+ Create Pipelineoption.TheCreate Pipelinedialog box is displayed.Create Pipeline
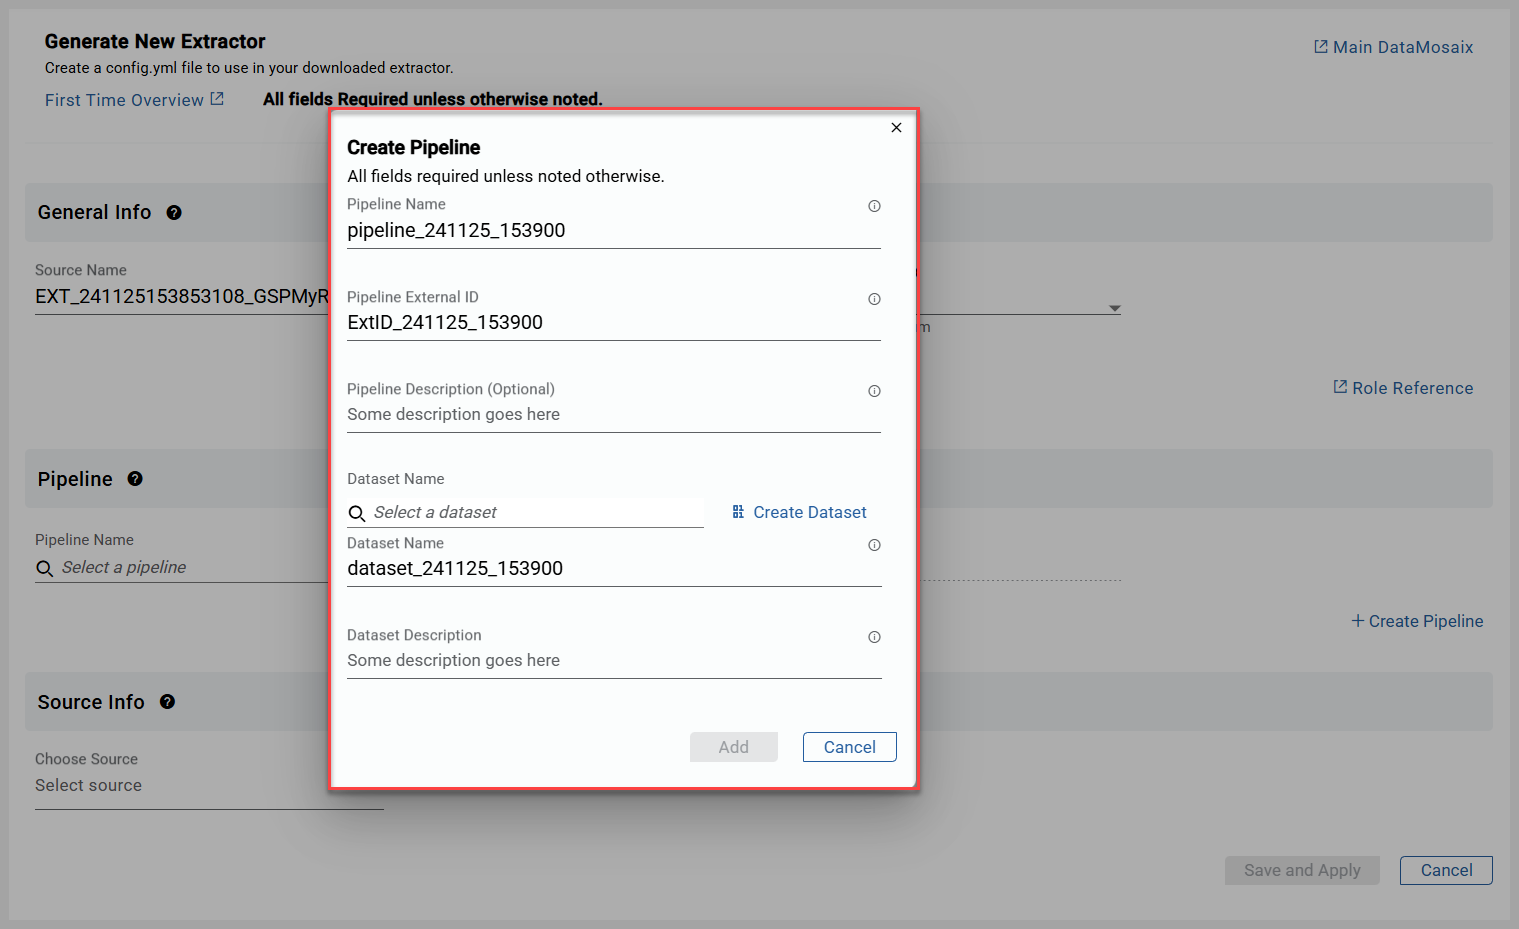
- Provide the following Pipeline information to create a new pipeline:
- Pipeline Name
- Pipeline External ID
- Pipeline Description (Optional)
- When you create a pipeline, you can either select an existing dataset or create a new dataset. Select a Dataset from theDataset Namesearch field, if you want to use an existing Dataset.If you choose to create a new Dataset, the Dataset-related fields will be displayed. Provide the following dataset information:
- Dataset Name
- Dataset Description
- ClickAdd. Based on the options you choose (select or create), the Pipeline and Dataset information is either populated or created and displayed on theExtractor Info Detailpage.
- In theSource Infosection, selectFT View SEas the extractor source type. After selection, the system will display fields such asEndpoint URL,Username,Password, and other required parameters for you to provide the necessary details.Generate New Extractor - Source Info

- Provide the following information to connect with source.
- Select sourceFT View SEfrom dropdown.
- Entersource system URL.
- Provide theusernameandpassword.
- Specify theStart dateandtimefrom which data should be fetched. If not provided, the default is thecurrent dateandcurrent time minus 2 hoursNOTE:Set the start date and time for the FT View SE connector extractor. Once it is set up, it will not change later because the data will be pushed using incremental refresh. So, make sure you choose the correct point from where you want to start pushing data.
- ChooseRun Optionsto run the extractor either manually from the console or automatically as a Windows service.
- Manual-Console: Select this option to run the extractor manually from the console. To install and run the extractor in this mode, refer to the documentation pageInstall and Run FactoryTalk View SE – FactoryTalk DataMosaix Connector (Manual‑Console).
- Automatic-Service: Select this option to run the extractor automatically as a background Windows service. To install and run the extractor in this mode, refer to the documentation pageInstall and Run FactoryTalk View SE – FactoryTalk DataMosaix Connector (Automatic‑Service).
- Mode isContinuousorSingle.
- Continuous: Fetch data at regular intervals. Enter the interval in hours.
- Single: Fetch data once. Donotprovide an interval.
- Enter theApplication Namewhose data needs to be retrieved.
- Provide theHMI server nameto connect to.
- ClickSave and Apply.TheGenerated info Saveddialog box is displayed, and it contains the configuration information. To view the configuration file, clickView Generated Configuration File. Alternatively, copy and save the information for future use by clickingCopy All. To download the configuration file, clickDownload. This will download aconfig.ymlfile containing all the configuration details required to run the extractor.Extractor Configuration File Download
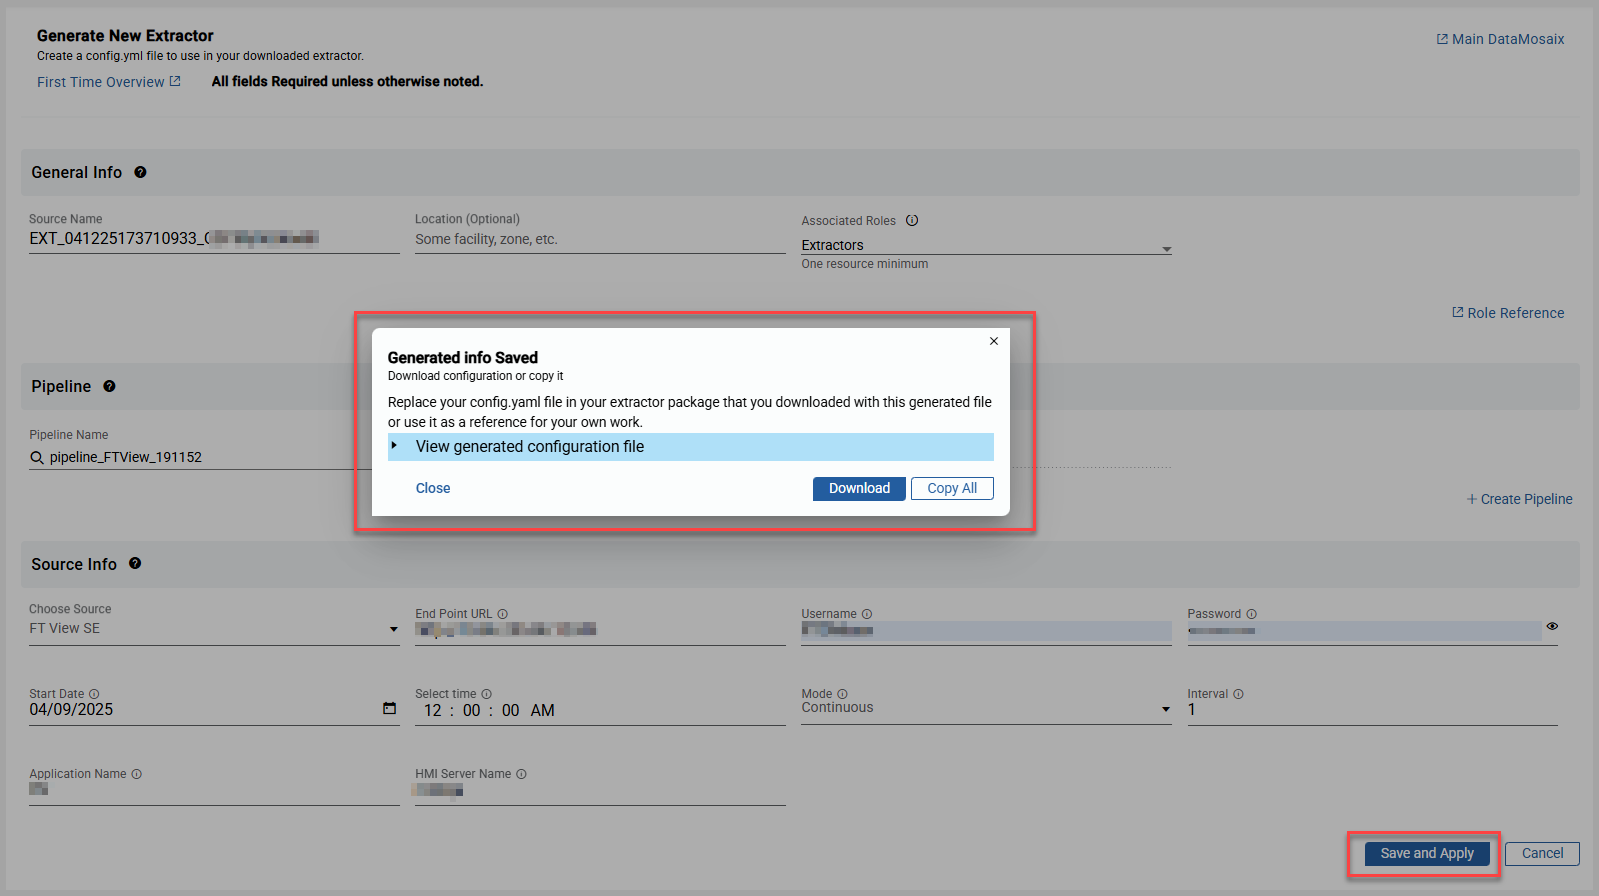
- ClickCloseto close the pop-up window.The new extractor is displayed underExtractor File Configurations.
Provide Feedback