
Prepare a Flat Media Cable Connector
The following tools are required to perform these steps:
- Scissors
- Parallel-action, flat-jaw pliers
- Inspect each end of the 1486-CBL flat media cable for a clean-edge cut that is perpendicular to the inner wall of the 1486-CON connector. If necessary, recut the edge.
- Lift the cover
 of the 1486-CON connector to access the cable tray. Remove and
recycle the paper insert.Lift Connector Cover
of the 1486-CON connector to access the cable tray. Remove and
recycle the paper insert.Lift Connector Cover TIP:If the cover becomes separated from the 1486-CON connector:
- Align the two tabs on the cover with the two slots on the 1486-CON connector, then apply pressure to snap the cover in back into place.
- Repeat step 2.
- Position the gray dashed edge of the cable facing the hinged side of the connector.
- Align the cable, then insert it under the two hooks
 on the cable tray
of the connector.Align Flat Media Cable (1486-CON-P1 Shown)
on the cable tray
of the connector.Align Flat Media Cable (1486-CON-P1 Shown)
- Gently flex the flat media cable, then place the bottom edge of the 1486-CBL flat media cable under the two hooks
 farthest from the hinged side of the connector.Flex the Cable
- Gently push the middle of the cable down to make sure that it is flush against the cable tray.Cable Flush with Cable Tray

- Slide the cable into position and ensure proper spacing based on the connector type, then close the cover of the connector. See 1486-CBL Flat Media Cable
Requirements for proper positioning and spacing.Close the Connector
 TIP:For 1486-CON-P1, if necessary, slide the 1486-CON-P1 connector along the 1486-CBL flat media cable to the desired final position.The latches on the cover engage with the retaining latches of the cable tray.Engage Latches of Cable Tray
- Use parallel-action flat-jaw pliers (preferred) to clamp the cover and protective cap.TIP:If you are using a Knipex® parallel-action pliers 86 03 250, adjust the jaw opening to 27 mm.Clamp the Cover and Protective Cap
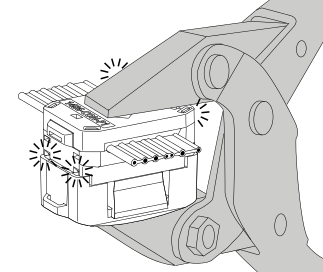 The four corner posts are flush with the cover when the connector is fully terminated.Fully Terminated Connector
 ItemDescriptionConnector corner postsSide view — connector fully terminatedSide view — connector not fully terminated
 - Verify that the cable is fully terminated in the connector. If the flat media cable is not fully terminated, repeat Step 7.
- Remove and recycle the protective cap.TIP:For 1486-CON-S1 and 1486-CON-T1 connectors, the protective cap is not required; however, it is fitted onto the bottom of the connector before clamping to allow a consistent opening gap of the clamping tool.
Provide Feedback